Enabling htaccess Files on Apache in Windows. Learn how to easily enable .htaccess on Apache2 in Windows. By default, XAMPP and similar Apache Web Servers running on Windows do not have mod_rewrite enabled, which causes Apache to ignore .htaccess files.
This step-by-step guide will help you activate mod_rewrite, allowing you to use .htaccess files effectively. Whether you're optimizing WordPress permalinks, improving site security, or setting up redirects, it has you covered.
How to Enable htaccess Files

What is an .htaccess File?
An .htaccess file (Hypertext Access File) is a configuration file used on Apache web servers to customize server behavior for specific directories. These settings override the server's global configuration and apply to the directory where the file is located and its subdirectories.
Common Uses of .htaccess Files
- URL Rewriting: Create user-friendly, SEO-optimized URLs.
- Authentication and Authorization: Protect certain areas of your website with a username and password.
- Custom Error Pages: Design unique pages for error codes like 404 or 500.
- Redirects: Manage redirects for seamless navigation and improved SEO.
- Security: Block IP addresses and restrict directory access to enhance website security.
Note: The .htaccess file is specific to Apache servers. Other web servers, like Nginx, use completely different configuration methods.
How to Create htaccess Files in Windows
By default, Windows does not allow you to name a file .htaccess. Attempting to do so results in the error: "You must type a filename." Fortunately, there's a simple workaround to force Windows to accept .htaccess as a file name. Here's how:
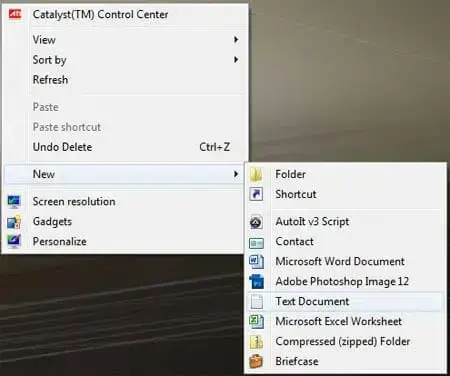
- From your Desktop, right-click and select New > Text Document.

- Open the New Text Document.
- Navigate to and select File > Save As.

- (1) For "File name:" enter .htaccess.
(2) Next to "Save as type:" select All Files (*.*) from the dropdown.
(3) Click Save.

That's all there is to it! You should now have an .htaccess file on your Windows Desktop.
How to Enable htaccess on Apache2 in Windows
Follow these steps to enable htaccess files on an Apache server in Windows, such as those using XAMPP:
-
-
- Locate and open the httpd.conf file: Navigate to the
apache/confdirectory in your XAMPP installation and open the file in a text editor. - Enable mod_rewrite: Find the line:
#LoadModule rewrite_module modules/mod_rewrite.soRemove the
#to enable the module:LoadModule rewrite_module modules/mod_rewrite.so - Update directory settings: Look for the section starting with:
<Directory "path_to_your_directory">Ensure it contains the following directive:
AllowOverride AllThis enables the .htaccess file to override default settings.
- Restart Apache: Use the XAMPP control panel to restart the Apache server for the changes to take effect.
- Create an .htaccess file: Place this file in your website's root directory and add your rewrite rules or other configurations.
- Locate and open the httpd.conf file: Navigate to the
Once complete, your server will recognize and use .htaccess files to manage configurations such as URL redirection, access control, and more.
How to Enable htaccess for WordPress
Using htaccess files is crucial for WordPress sites, especially for enabling pretty permalinks. Here's how to enable and configure WordPress htaccess:
- Check for an Existing htaccess File: Look for the .htaccess file in your WordPress root directory. If it doesn't exist, create one.
- Set File Permissions: Ensure the file permissions are set to
644for security. Use an FTP client or hosting control panel for this step. - Update Permalink Settings:
- Go to Settings → Permalinks in your WordPress admin dashboard.
- Select your desired permalink structure and save changes.
- WordPress will automatically update the .htaccess file with the appropriate rewrite rules.
After these steps, your WordPress site will use pretty permalinks, enhancing both user experience and SEO.
.htaccess FAQs
Here are some commonly asked questions regarding the use of .htaccess files:
What happens if the htaccess file is not working?
Ensure that mod_rewrite is enabled in Apache, and check for syntax errors in your .htaccess file.
Can I use .htaccess on Nginx?
No, .htaccess is specific to Apache servers. Nginx uses a different configuration system (nginx.conf).
What are the security risks of .htaccess files?
Incorrectly configured .htaccess files can expose sensitive data or create vulnerabilities. Always review and test configurations carefully.
Advanced Tips for Optimization
- Leverage Browser Caching: Add rules to cache static resources for faster page loads.
- Implement HTTPS Redirection: Force all traffic to use HTTPS for better security and SEO.
- Protect Sensitive Files: Deny access to sensitive files like wp-config.php or .env.
Important Notes
Note: These instructions apply to Apache-based servers only. If you are using Nginx or other server types, the configuration process will differ. By following this guide, you can fully leverage the power of htaccess XAMPP and WordPress htaccess. You can make htaccess files in Windows for enhanced functionality, security, and SEO on Apache servers.
-