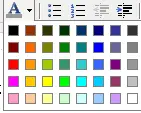
By default the WordPress WYSIWYG editor is pretty basic. In my opinion, the average WordPress user is probably one that does not know or care to learn a lot about html (they just want to blog). In which case most people that use WordPress are likely to use the WYSIWYG visual editor over the code editor. One important missing element from the visual editor is the ability to select or change font color or text color. The following tutorial explains how to add a nice little font color selection tool to your WordPress WYSIWYG visual editor.
Before:

After:

Adding a font color selection box to the WYSIWYG menu:
1. FTP to your server and download the tiny_mce_confg.php file from your wp-includes/js/tinymce/ directory
2. Open the tiny_mce_confg.php file with a text editor
3. From within the tiny_mce_config.php file, find the line that starts like the following:
$mce_buttons = apply_filters('mce_buttons'
Replace 'strikethrough' with 'strikethrough', 'forecolor'Â so the line starts like the following:
$mce_buttons = apply_filters('mce_buttons', array('bold', 'italic', 'strikethrough', 'forecolor', 'separator',
4. Save your changes and upload the new tiny_mce_config.php file to your wp-includes/js/tinymce/ directory, replacing or overwriting the old file.
Now, when you go to write or edit a page or post, you should have a font color selection drop down box with which you can use to change the color of your text as you write.
