How do you host Website from home? In the past, web site hosting from home was something that the average person with a limited understanding of networking wouldn't dare attempt. But nowadays with the introduction of complete (Apache/PHP/SQL) packages such as Xampp, EasyPHP and NetServer, it isn't uncommon for anyone to dabble with hosting their own sites from home. In fact in the past, I have personally hosted a few of my sites from my house.
Advantages of Hosting a Website from home
- Accessibility - Easy to do modifications because you have direct access to all of the files. (no need to FTP).
- Education - Allows you to understand and learn the inner workings and operations of a server.
- Cost - You don't have to pay a web host: If you already have a broadband connection at home, why not make the best use of it?
- Experimentation - You can use your web server to test out your projects before putting them into production.
Disadvantages of Hosting a Site from home
- Speed - You wouldn't want to host your sites from home if they are generating a high volume of traffic.
- Maintenance - It's up to you to administer and maintain the server.
- Uptime - The server must be up and running 24/7.
How to Host Website from Home
In order to host Website from home, we're going to use NetServer. Mainly because I feel it is one of the easiest server packages to setup within a Windows Operating environment. If you are using a Linux operating system, you might want to try using XAMPP, instead.
- First let's Download Netserver
- Run the executable and extract the files to the folder you wish to run the server from.
Example: C:\server
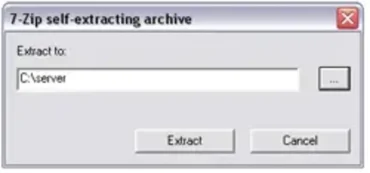
- Find the folder you extracted the files to and double click NetServer.exe
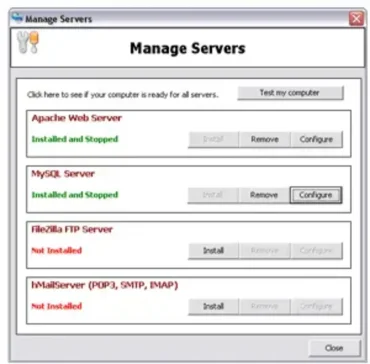
- Click Manage Servers as seen below:
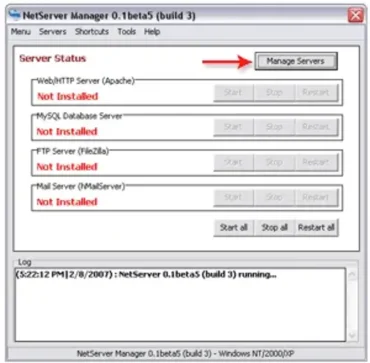
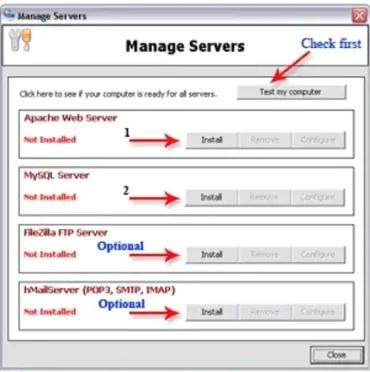
- Now you'll need to install the core Server components (Apache and MySQL).But first click Test my Computer to ensure that port 80 and 336 are available.And then proceed to install (1) Apache and (2) MySQL.
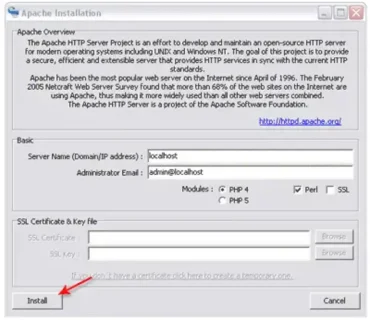
- Leave the Server Name and Email as localhost, and click Install.
- After installing MySQL, you will get a password warning box - as shown below. Click OK.

- Once everything is installed, the Manage Servers window should look like the one below.
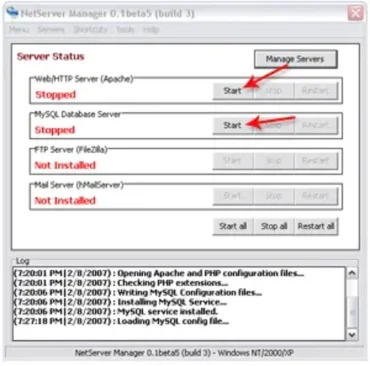
- From the NetServer Manager window, Start the HTTP and MySQL server components.
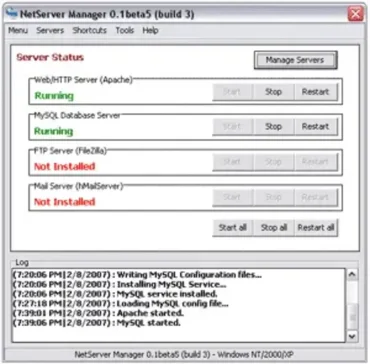
- If all goes well, your NetServer Manager should look like the one below.
- Now let's go ahead and set your MySQL Password.
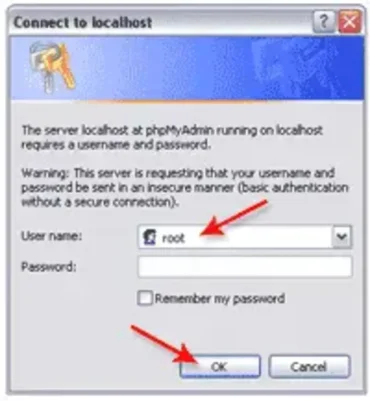
To do this, open up your web browser and then type:http://localhost/phpMyAdmin/ - You will get a prompt asking for your username and password. Since there is no password assigned yet, just type in root for the username and click ok.
- The phpMyAdmin control panel should now be open in your browser. From here, we should probably set the password access for phpMyAdmin. So from the menu select Change password.
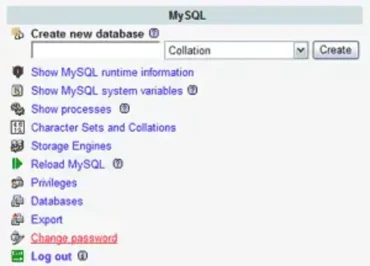
- Type in the password and then click change.
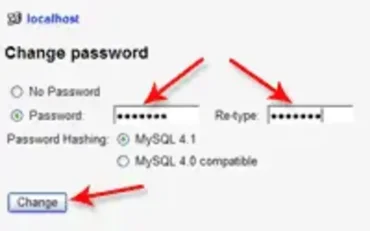
- Now you should be able to login using username root with your password.
Congratulations, your Home Based Web Site Server should be functional. To ensure that your server is accessible from the internet, you should now try to access your server from your computer's external IP address.
Just type the external IP address in the browser and then if you get a page like the one below, you're good to go.
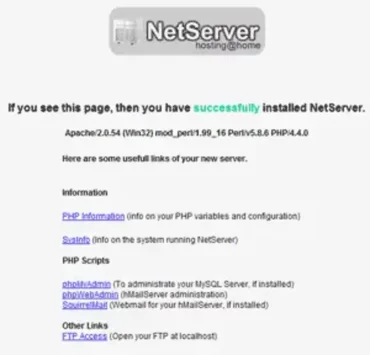
The www directory contains your website(s). And all of your site related html or php pages should go there. To point a domain name to the new server, login at the registrar your domain name was purchased from and just set the A Host to point to your external IP address. There you have it, an easy way to run your own server or host Website from home.
In a follow up tutorial, I'll cover how to setup a virtual server, which will also allow you to add more domains to the same box. So stay tuned!
