
How to Install Raspberry Pi OS to USB from Windows (Manual Method): Want to run Raspberry Pi OS directly from a USB drive on your Windows PC? This guide shows you how to manually install Raspberry Pi Desktop to a bootable USB using tools like Win32 Disk Imager or dd.
This method lets you test the Raspberry Pi desktop environment without a Raspberry Pi board, run a portable Linux system, or safely experiment without modifying your main hard drive.
How to Install Raspberry Pi OS to USB from Windows
- Download the Raspberry Pi Desktop ISO
- Insert a USB flash drive (8GB or larger)
- Write the image using Win32 Disk Imager or dd
- Restart your PC and boot from the USB device
What You Need
- 7-Zip – Extract compressed files
- Win32 Disk Imager or dd for Windows
- Raspberry Pi Desktop ISO
- USB Flash Drive – 8GB or larger recommended
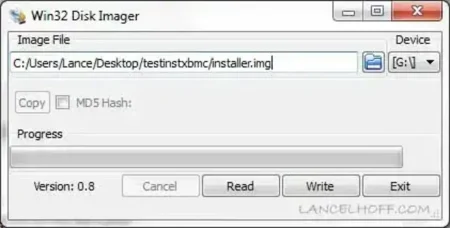
Create a Bootable Raspberry Pi USB (Win32 Disk Imager)
- Insert your USB flash drive
- Extract Win32 Disk Imager using 7-Zip
- Launch
Win32DiskImager.exe - Select the Raspberry Pi Desktop ISO file
- Choose your USB drive letter
- Click Write and wait for completion
Create a Bootable USB Using dd (Windows)
Warning: This process will erase all data on the selected drive. Double check before continuing.
- Download the Raspberry Pi Desktop ISO
- Insert your USB drive
- Open Command Prompt as Administrator
diskpart- List disks:
list diskIdentify your USB disk number carefully.
- Select your disk:
select disk X- Clean the drive:
clean- Exit diskpart:
exit- Write the image using dd:
dd.exe if=path-to-raspberrypi.iso of=\\.\PhysicalDriveX bs=4M --progress- Restart your PC and boot from the USB device
Create a Raspberry Pi OS USB Using YUMI (exFAT Method)
You can also use YUMI exFAT (Your Universal Multiboot Installer) to create a bootable USB that supports multiple operating systems. This is a great option if you want to run Raspberry Pi OS alongside other Linux distributions, USB Windows installers, or recovery tools from a single USB drive.
Compared to traditional multiboot tools, YUMI exFAT offers improved compatibility and works well with Raspberry Pi Desktop in most cases.
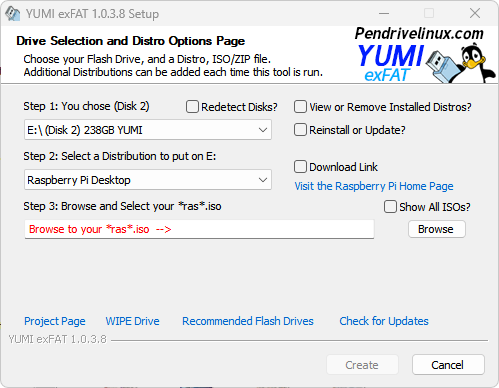
- Download and launch YUMI exFAT
- Select your USB flash drive
- Choose Try Raspberry Pi from the distribution list
- Browse and select the Raspberry Pi Desktop ISO file
- Click Create and wait for completion
- Restart your computer and boot from the USB device
If you encounter boot issues, consider using the direct imaging methods above for maximum compatibility.
Create a Bootable USB Using dd (Linux)
Warning: Selecting the wrong device will overwrite data.
- Download the ISO file
- Insert your USB drive
- Open a terminal
- Identify the USB device:
sudo fdisk -lLook for a device such as /dev/sdX.
- Write the image:
sudo dd if=path-to-raspberrypi.iso of=/dev/sdX bs=4M status=progress oflag=sync- Reboot and select the USB from the boot menu
Create a Bootable USB Using dd (macOS)
Warning: Confirm the correct disk identifier before writing.
- Download the ISO file
- Insert the USB drive
- Open Terminal
- List disks:
diskutil listIdentify your USB (for example /dev/disk2).
- Unmount the disk:
diskutil unmountDisk /dev/disk2- Write the image:
sudo dd if=path-to-raspberrypi.iso of=/dev/rdisk2 bs=4m- Eject the drive:
diskutil eject /dev/disk2How to Boot from the USB Drive
- Restart your computer
- Enter BIOS or Boot Menu (F2, F12, DEL, or ESC)
- Select the USB device
- Continue booting
Tips for Best Performance
- Use a USB 3.0 or faster drive
- Performance depends on your hardware
- Your internal drive remains untouched
FAQ
Do I need a Raspberry Pi board?
No, Raspberry Pi Desktop runs directly on standard PC hardware.
Will this erase my hard drive?
No, only the USB drive is written to during this process.
Can I save changes?
Yes, changes are stored directly on the USB drive.
Why won’t my PC boot from USB?
Check BIOS settings and ensure USB boot is enabled.
Final Notes
You now have multiple ways to install and run Raspberry Pi OS from a USB drive on Windows, Linux, or macOS. This is a safe and flexible way to test the Raspberry Pi desktop environment, experiment with Linux, or carry a portable operating system wherever you go.