Uninstall Avast Antivirus from a Mac or Windows: Avast is a widely used antivirus software that offers robust protection for both Mac and Windows users. However, some users may prefer to switch to a different antivirus solution or simply want to remove Avast from their system. Unlike other applications, uninstalling Avast requires a few extra steps to ensure it's completely removed. This guide will walk you through the process on both Mac and Windows.
Why Uninstall Avast Antivirus?
Before diving into the removal process, it's essential to understand why some users might choose to uninstall Avast:
- Performance Impact: Avast may consume system resources, potentially slowing down your computer.
- Switching to Another Antivirus: Users may prefer alternative antivirus solutions with different features.
- Personal Preference: Some users might find Avast's notifications or interface intrusive.
Uninstall Avast Antivirus from a Mac
To Uninstall Avast Antivirus from a Mac OS based system, use these steps:
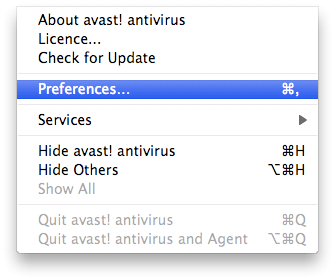
- Access Avast Preferences: Navigate to Avast > Preferences on your Mac. This will open the settings where you can adjust Avast's behavior and preferences.

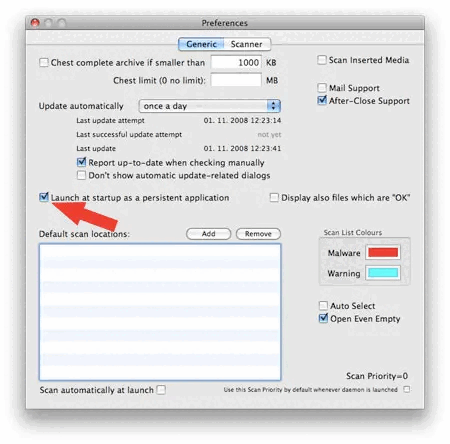
- Disable Persistent Launch at Startup: In Preferences, uncheck the option labeled Launch at startup as a persistent application. This prevents Avast from running automatically on startup.

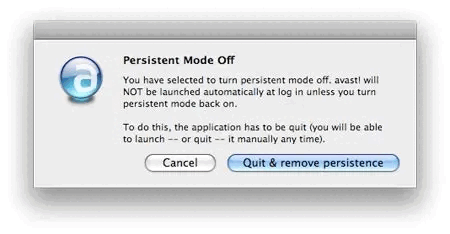
- Quit Avast and Remove Persistence: Confirm the changes and click Quit and remove persistence to fully shut down Avast.

Remove or Uninstall Avast Antivirus from a Mac - Quit and remove persistence - Remove Avast from Applications: Go to your Applications folder, drag Avast to the Trash, and then right-click the Trash to Empty Trash and remove Avast completely.
Uninstall Avast Antivirus from Windows
To Uninstall Avast Antivirus from a Windows computer, you can follow these steps:
- Open the Control Panel: Press the Windows key and type Control Panel, then click to open it.
- Go to Programs and Features: In the Control Panel, click on Programs > Programs and Features to see a list of installed programs.
- Locate and Uninstall Avast: Scroll down to find Avast Free Antivirus, select it, and click the Uninstall button.
- Follow the Uninstallation Wizard: Follow the on-screen instructions and choose to Remove all Avast components. Wait for the process to complete.
- Restart Your Computer: After uninstallation, restart your computer to remove any remaining Avast files.
Completely Remove Avast Using the Avast Uninstall Utility
If you experience issues uninstalling Avast through the Control Panel, you can use the Avast Uninstall Utility. Here's how:
- Download the Avast Uninstall Utility: Visit the official page and download the Avast Uninstall Utility
- Boot into Safe Mode: Before running the tool, restart your computer in Safe Mode to ensure that no Avast processes are running. To do this, press the Windows key + R, type msconfig, go to the Boot tab, and check Safe Boot. Restart your computer.
- Run the Avast Uninstall Utility: Once in Safe Mode, run the downloaded utility. It will detect the location of your Avast installation automatically. Click Remove to uninstall Avast completely.
- Restart Your Computer Again: After the tool finishes, uncheck Safe Boot in the system configuration and restart your computer to return to normal mode.
Additional Tips
- Check for Leftover Files: After using the Avast Uninstall Utility, navigate to your Program Files and ProgramData folders to ensure no Avast files remain.
- Use a Registry Cleaner: For advanced users, you might want to use a registry cleaner to remove any leftover entries related to Avast.
By following these steps, you can successfully remove Avast Antivirus from both Mac and Windows systems. Whether you're switching to a new antivirus solution or simply freeing up system resources, this guide ensures a complete removal of Avast from your computer.